
第一部分就是最簡單的helloworld了:掌握使用控件創建簡單的GIS應用程序~
(前期相關環境配置略掉~請自行百度~)
首先打開VS2010,,通過(文件--新建--項目--Windos窗體應用程序) ,我們新建一個名叫“MyHelloWorld”的Windows 窗體應用程序。然后就要開始往里面填控件了:
在 VS 的工具箱中找到到和 ArcGIS Engine 相關的控件 ,在這里我們使用AxTOCControl(目錄控件),AxLicenseControl (許可控件),以及MapControl,在這里MapControl對應于 ArcMap 中的數據視圖,它封裝了Map 對象,并提供了額外的屬性,方法,事件等。是我們在接來下的一系列開發中必不可少的一環。
將3個控件排列一下后,效果如下圖所示:
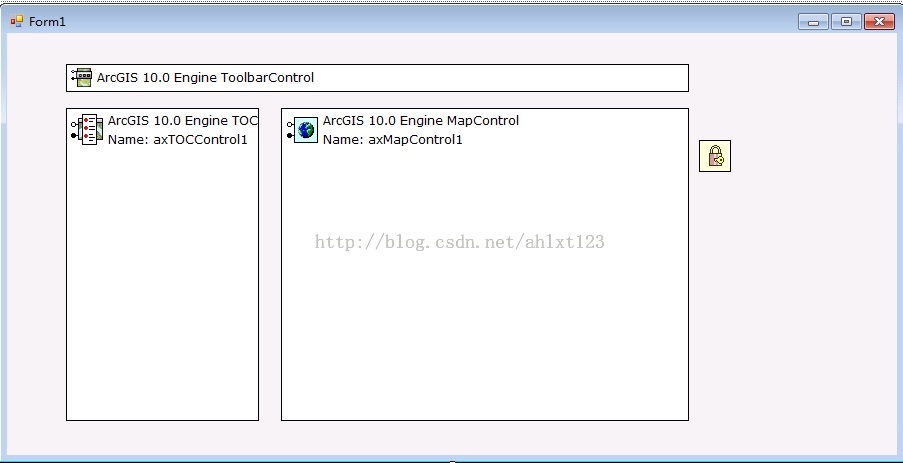
注意:
1.其中AxLicenseControl 控件是整個Arcengine開發中必須的許可控件,如果沒有它或者沒有ArcEngine的Lisence許可的話,我們是無法調用任何GIS功能的。
2.將三個控件拖入窗體后,我們會發現系統自動導入了相關引用,但無論是系統自己導入的引用還是我們手動導入的,請注意將引用屬性中的“復制本地”設置為False,否則可能會產生無法運行代碼的情況。
控件設置好之后,我們打開Program.cs,在系統的入口處添加這樣一行代碼:
ESRI.ArcGIS.RuntimeManager.Bind(ESRI.ArcGIS.ProductCode.EngineOrDesktop);
這主要是針對Arcgis10.0的變化而設置的,添加后的代碼如下:
namespace MyHelloWorld
{
 static class Program
 {
 ///
 /// The main entry point for the application.
 ///
 [STAThread]
 static void Main()
 {

 ESRI.ArcGIS.RuntimeManager.Bind(ESRI.ArcGIS.ProductCode.EngineOrDesktop);
 Application.EnableVisualStyles();
 Application.SetCompatibleTextRenderingDefault(false);
 Application.Run(new Form1());
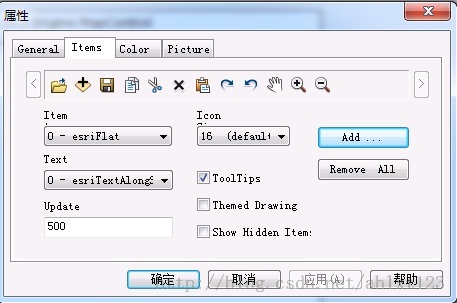
接下來,我們就可以通過設置編輯ToolbarControl的屬性,來給它添加上我們需要的工具了,同時要記得在ToolBar控件和axTOCCControl1控件的屬性設置中,將ToolBar的Buddy選項設置為axTOCCControl1,這樣就可以將二者進行聯動。
在ToolbarControl的屬性設置中,我們可以通右鍵——屬性——Item來給Toolbar控件設置我們需要的工具,在這里我選擇了一些常用的工具:保存、移動、撤銷、放大、縮小等等,過程如下圖所示:
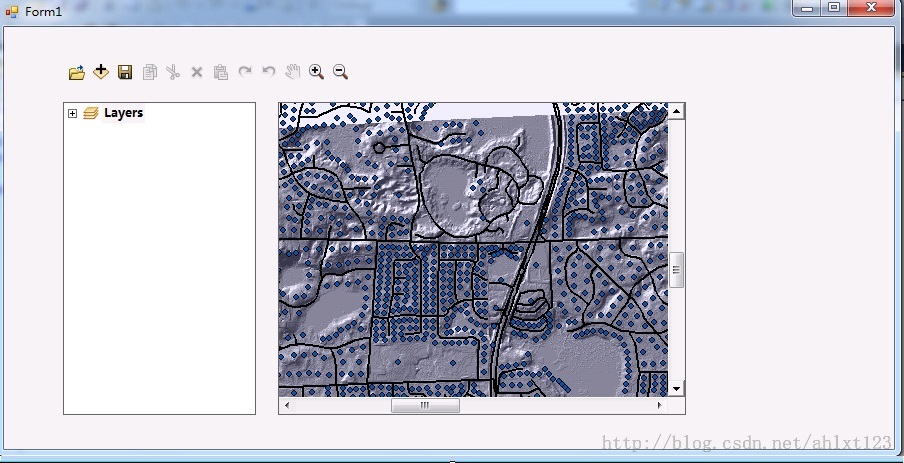
全部設置后之后,第一章的內容就基本結束了,將程序調試后,最終效果如下圖,一個最簡單的GIS桌面程序就出來啦~~
打開地圖文檔、鷹眼圖的制作
首先是制作一個按鈕來負責打開地圖文檔:
在toolbox中選擇Button控件拖入我們的Form中,接下來在該button的Cilck事件中調用 OpenFileDialog類獲取文件路徑后,
將文件路徑調用到axMapControl1.LoadMxFile(path)中就可以打開MXD文檔了。
 private void button1_Click(object sender, EventArgs e)
 {
 OpenFileDialog OpenMXD = new OpenFileDialog();
 OpenMXD.Title = "打開地圖";
 OpenMXD.InitialDirectory = "E:";
 OpenMXD.Filter = "Map Documents (*.mxd)|*.mxd";
 if (OpenMXD.ShowDialog() == DialogResult.OK)
 {
 string MxdPath = OpenMXD.FileName;
 axMapControl1.LoadMxFile(MxdPath);
 }
 }
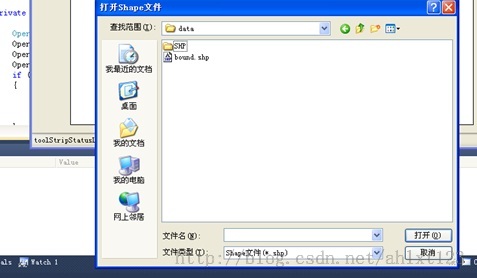
我們可以通過相同的方法打開shape文件,但是這里要注意:
axMapControl1.AddShapeFile()方法中,并不是像LoadMx一樣直接輸入文件路徑就行,而是AddShapeFile(filePath, fileName),因此我們要先編寫一個函數將文件路徑的字符串進行分割:
private void button2_Click(object sender, EventArgs e)
{
 {
 string[] S = OpenShapeFile();
 try
 {
 axMapControl1.AddShapeFile(S[0], S[1]);
 }
 catch
 {
 MessageBox.Show("請至少選擇一個shape文件", "ERROR");

 }

 }
 }


public string[] OpenShapeFile()
{
 string[] ShpFile = new string[2];
 OpenFileDialog OpenShpFile = new OpenFileDialog();
 OpenShpFile.Title = "打開Shape文件";
 OpenShpFile.InitialDirectory = "E:";
 OpenShpFile.Filter = "Shape文件(*.shp)|*.shp";
 if (OpenShpFile.ShowDialog() == DialogResult.OK)
 {
 string ShapPath = OpenShpFile.FileName;
 //利用"\"將文件路徑分成兩部分
 int Position = ShapPath.LastIndexOf("\");
 string FilePath = ShapPath.Substring(0, Position);
 string ShpName = ShapPath.Substring(Position + 1);
 ShpFile[0] = FilePath;
 ShpFile[1] = ShpName;

 }
 return ShpFile;
}
運行后結果如下:
這部分完成后,接下來是鷹眼圖的制作~:
鷹眼圖的操作主要分為兩個部分,當在主控件中重新加載一幅圖的時候,另外一個控件的圖也發生相應的變化, 大致思路是在獲得你在打開主地圖后,向鷹眼圖(MapControl2)中添加相同的圖層,并不斷更新你在主地圖的當前范圍,再在鷹眼圖的對應區域中繪制一個紅框表示對應范圍。
這里主要使用了IEnvelope和IPoint接口,用來獲取鼠標所在坐標、繪制表示范圍的紅框,具體用法可以參考這里~
我們在form中拖入第二個地圖控件axMapControl2,用它作為axMapControl1的鷹眼圖進行表示。
這里首先對MapControl1的OnMapReplaced事件和OnExtentUpdated事件進行編寫,讓我們獲得MapControl1的地圖范圍更新,并向MapControl2添加圖層、繪制矩形:
private void axMapControl1_OnExtentUpdated(object sender, ESRI.ArcGIS.Controls.IMapControlEvents2_OnExtentUpdatedEvent e)
{
 //設置一個新的外接矩形
 IEnvelope pEnvelope = (IEnvelope)e.newEnvelope;
 IGraphicsContainer pGraphicsContainer = axMapControl2.Map as IGraphicsContainer;
 IActiveView pActiveView = pGraphicsContainer as IActiveView;
 //在繪制前,清除axMapControl2中的任何圖形元素
 pGraphicsContainer.DeleteAllElements();
 IRectangleElement pRectangleEle = new RectangleElementClass();
 IElement pElement = pRectangleEle as IElement;
 pElement.Geometry = pEnvelope;
 //設置鷹眼圖中的紅線框
 IRgbColor pColor = new RgbColorClass();
 pColor.Red = 255;
 pColor.Green = 0;
 pColor.Blue = 0;
 pColor.Transparency = 255;
 //產生一個線符號對象
 ILineSymbol pOutline = new SimpleLineSymbolClass();
 pOutline.Width = 3;
 pOutline.Color = pColor;
 //設置顏色屬性
 pColor = new RgbColorClass();
 pColor.Red = 255;
 pColor.Green = 0;
 pColor.Blue = 0;
 pColor.Transparency = 0;
 //設置填充符號的屬性
 IFillSymbol pFillSymbol = new SimpleFillSymbolClass();
 pFillSymbol.Color = pColor;
 pFillSymbol.Outline = pOutline;
 IFillShapeElement pFillShapeEle = pElement as IFillShapeElement;
 pFillShapeEle.Symbol = pFillSymbol;
 pGraphicsContainer.AddElement((IElement)pFillShapeEle, 0);
 pActiveView.PartialRefresh(esriViewDrawPhase.esriViewGraphics, null, null);
 //將地圖范圍顯示在StripStatus中
 IPoint ll, Ur;
 ll = axMapControl1.Extent.LowerLeft;
 Ur = axMapControl1.Extent.LowerRight;
 toolStripStatusLabel3.Text = "(" + Convert.ToString(ll.X) + "," + Convert.ToString(ll.Y) + ")";

}

private void axMapControl1_OnMapReplaced(object sender, ESRI.ArcGIS.Controls.IMapControlEvents2_OnMapReplacedEvent e)
{ //向MapControl2添加圖層
 if (axMapControl1.LayerCount > 0)
 {
 axMapControl2.Map = new MapClass();
 for (int i = 0; i <= axMapControl1.Map.LayerCount - 1; i++)
 {

 axMapControl2.AddLayer(axMapControl1.get_Layer(i));
 }
 axMapControl2.Extent = axMapControl1.Extent;
 axMapControl2.Refresh();

 }
}
接下來就是對MapControl2控件的On_MouseDown 和 On_MouseMove事件進行編寫,這樣可以讓我們通過拖動鷹眼圖上的紅框反向操作MapControl1中的地圖位置:
private void axMapControl2_OnMouseMove(object sender, ESRI.ArcGIS.Controls.IMapControlEvents2_OnMouseMoveEvent e)
 {
 if (e.button == 1)
 {
 IPoint pPoint = new PointClass();
 pPoint.PutCoords(e.mapX, e.mapY);
 axMapControl1.CenterAt(pPoint);
 axMapControl1.ActiveView.PartialRefresh(esriViewDrawPhase.esriViewGeography,
 null, null);
 }
 }

 private void axMapControl2_OnMouseDown(object sender, ESRI.ArcGIS.Controls.IMapControlEvents2_OnMouseDownEvent e)
 {
 if (axMapControl2.Map.LayerCount > 0)
 {
 if (e.button == 1)
 {
 IPoint pPoint = new PointClass(); //將點擊位置的坐標轉換后設為MapControl1的中心
 pPoint.PutCoords(e.mapX, e.mapY);
 axMapControl1.CenterAt(pPoint);
 axMapControl1.ActiveView.PartialRefresh(esriViewDrawPhase.esriViewGeography, null, null);
 }
 else if (e.button == 2)
 {
 IEnvelope pEnv = axMapControl2.TrackRectangle();
 axMapControl1.Extent = pEnv;
 axMapControl1.ActiveView.PartialRefresh(esriViewDrawPhase.esriViewGeography, null, null);
 }
 }

 }
最后在Form左下角再添加一個statusStrip控件,就可以實時顯示當前圖幅的范圍了~
最終效果如下:

屬性表的訪問與顯示
這里主要是訪問并顯示shapefile的屬性表~
大致思路如下:新建一個Form用來獲取選中要素的屬性表,而在初始界面右鍵點擊對應的矢量要素后,便打開新form將要素屬性表展示出來。
下面就開始咯~
首先要添加ESRI.ArcGIS.Controls、Geodatabase的引用,更新命名空間;
然后我們添加一個用于顯示屬性表內容新的 Form 窗體,在這個新的窗體上添加 dataGridView 控件,并添加Column。
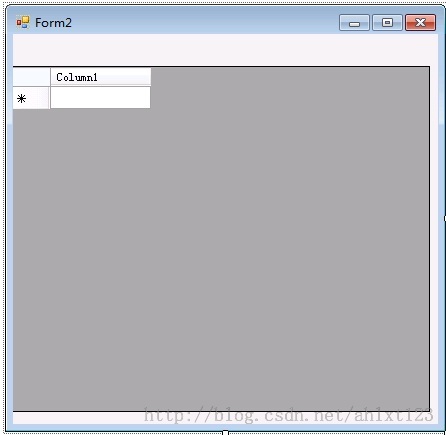
在Form2中,我們先將可能獲得的屬性表數據類型進行預定義:
public static string ParseFieldType(esriFieldType fieldType)//將EsriType 轉換為String
 {
 switch (fieldType)
 {
 case esriFieldType.esriFieldTypeBlob:
 return "System.String";
 case esriFieldType.esriFieldTypeDate:
 return "System.DateTime";
 case esriFieldType.esriFieldTypeDouble:
 return "System.Double";
 case esriFieldType.esriFieldTypeGeometry:
 return "System.String";
 case esriFieldType.esriFieldTypeGlobalID:
 return "System.String";
 case esriFieldType.esriFieldTypeGUID:
 return "System.String";
 case esriFieldType.esriFieldTypeInteger:
 return "System.Int32";
 case esriFieldType.esriFieldTypeOID:
 return "System.String";
 case esriFieldType.esriFieldTypeRaster:
 return "System.String";
 case esriFieldType.esriFieldTypeSingle:
 return "System.Single";
 case esriFieldType.esriFieldTypeSmallInteger:
 return "System.Int32";
 case esriFieldType.esriFieldTypeString:
 return "System.String";
 default:
 return "System.String";
 }
 }
然后就是獲取shpaefile的屬性表了,這里我們主要使用 IField、IFeatureCursor、IFeature 這三個接口來達成目標:
接口說明如下:
代碼如下:
public void Opentable()
 {
 IFields pFields;
 pFields = pFeaturelayer.FeatureClass.Fields;
 dataGridView1.ColumnCount = pFields.FieldCount;
 for (int i = 0; i < pFields.FieldCount; i++)
 {
 string fldName = pFields.get_Field(i).Name;
 dataGridView1.Columns[i].Name = fldName;
 dataGridView1.Columns[i].ValueType = System.Type.GetType(ParseFieldType(pFields.get_Field(i).Type));
 }
 IFeatureCursor pFeatureCursor;
 pFeatureCursor = pFeaturelayer.FeatureClass.Search(null, false);
 IFeature pFeature;
 pFeature = pFeatureCursor.NextFeature();
 while (pFeature != null)
 {
 string[] fldValue = new string[pFields.FieldCount];
 for (int i = 0; i < pFields.FieldCount; i++)
 {
 string fldName;
 fldName = pFields.get_Field(i).Name;
 if (fldName == pFeaturelayer.FeatureClass.ShapeFieldName)
 {
 fldValue[i] = Convert.ToString(pFeature.Shape.GeometryType);
 }
 else
 fldValue[i] = Convert.ToString(pFeature.get_Value(i));
 }
 dataGridView1.Rows.Add(fldValue);
 pFeature = pFeatureCursor.NextFeature();
 }
 }
搞定~接下來就是在初始界面選定要素后跳轉界面顯示屬性表了~
先在form1中進行預定義:
IFeatureLayer pFeatureLayer = null;
public IFeatureLayer pGlobalFeatureLayer; //定義全局變量
public ILayer player;
因為決定在右擊鼠標時顯示選項,在Form1窗體中添加contextMenuStrip控件,添加選項”顯示屬性表“,在click事件中打開新form:
Form2 Ft = new Form2(player as IFeatureLayer);
 Ft.Show();
然后就保證右鍵點擊相關圖層要素后能夠成功打開對應屬性表啦,這里主要用了TOCControl的 HitTest()方法:
publicvoid HitTest ( int X, int Y, ref esriTOCControlItem ItemType, ref IBasicMapBasicMap, ref ILayer Layer, ref object Unk, ref object Data );
其中
在TOCControl控件的 OnMouseDown 事件下添加如下代碼即可~:
if (axMapControl1.LayerCount > 0)
{
 esriTOCControlItem pItem = new esriTOCControlItem();
 pGlobalFeatureLayer = new FeatureLayerClass();
 IBasicMap pBasicMap = new MapClass();
 object pOther = new object();
 object pIndex = new object();
 axTOCControl1.HitTest(e.x, e.y, ref pItem, ref pBasicMap, ref player, ref pOther, ref pIndex);
}
if (e.button == 2)
{
 contextMenuStrip1.Show(axTOCControl1, e.x, e.y);
}
大功告成~~
運行結果如下:
右擊顯示屬性表:
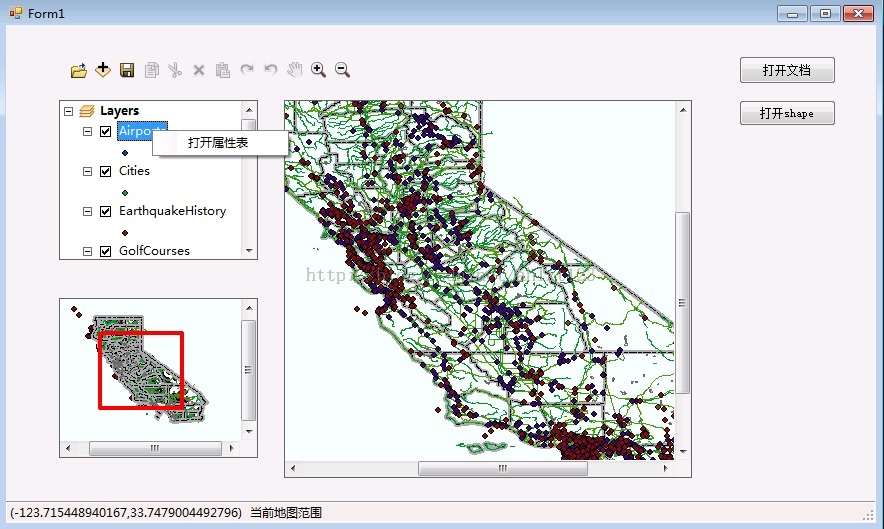
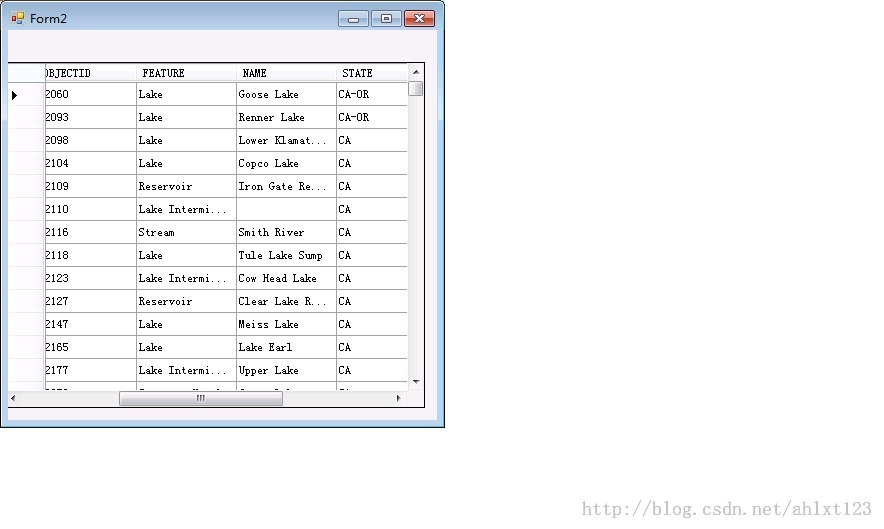
點擊后出現屬性表~~~:
聲明:本網頁內容旨在傳播知識,若有侵權等問題請及時與本網聯系,我們將在第一時間刪除處理。TEL:177 7030 7066 E-MAIL:11247931@qq.com
Copyright ? 2019-2025 www.polareal.com 版權所有
違法及侵權請聯系:TEL:177 7030 7066 E-MAIL:11247931@qq.com 本站由北京市萬商天勤律師事務所王興未律師提供法律服務


